 |
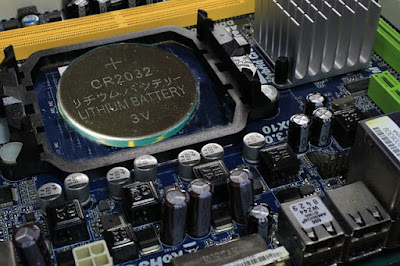
the motherboard of the computer. The basic function of this chip is to store settings and informations that is related to the BIOS. It also supplies power to the BIOS even when the computer is turned off.
Therefore whatever the change you make on the BIOS is recorded in the CMOS. Generally when a computer is turned off, the CMOS will record a set of numbers. Next time when a computer is turned on, the CMOS will check these set of numbers with the numbers that BIOS generated. If those numbers does not match it will end up showing a black screen with the error,
'' CMOS checksum error - Defaults loaded ''
'' CMOS checksum is bad ''
'' CMOS checksum is invalid ''
'' CMOS Reset ( 502 ) ''
No matter how many you restart the computer you will get the same error message. The reason for this may be either the CMOS values are corrupted or the CMOS chip is malfunctioned/dead. Due to any of those reasons the computer will not only refuse to boot it will also show wrong times since the computer's internal clock depends on the CMOS battery for its power.
In this article I will be guiding you on how to fix CMOS checksum error | invalid 502. After the end of this guide, you will know the solutions and finally repair 502 errors in the CMOS checksum which invalidates booting.
Let's get into the topic,
1. Replace CMOS Battery
CMOS battery is the small button type battery which is usually found on the motherboard. It is generally present with the model number CR2032 3V. A standard CMOS battery has a usage of over 5 years. After this period the battery may malfunction being unable to supply required power needed for the computer to boot.
To overcome this issue simply replace the CMOS battery by purchasing one from a computer store. In desktop computer the CMOS battery can be easily found for replacement. But not in the case of a laptop. Some laptop needs the help of a professional in order for you to replace the CMOS battery. But before replacing make sure that the CMOS battery is completely dead.
To check the CMOS battery,
1. Turn on the computer.2. Press and hold F2 or Del key to enter BIOS Setup Utility.
3. In the menu locate the System time and System date.
If the system time and date is incorrect, it is a clear indication that the CMOS battery has failed.
2. Reset BIOS
The other option you may use to resolve this issue is by resetting the BIOS. The values on the BIOS assists the system to boot. The boot values can be corrupted due to many reasons. Some of them are Sudden power loss while updating the BIOS, Incorrect BIOS update and Malware attacks. In any of those reasons, the values of the BIOS will be corrupted and no longer the boot process takes place.
So by resetting the BIOS to default settings you can easily fix this. Some motherboards comes with a switch on it, that can be pressed to reset the BIOS. If the switch is not found, removing the CMOS battery will also cause the BIOS to reset. Apart from that the easiest way to reset the BIOS is to use the BIOS Setup Utility.
For Resetting the BIOS,
1. Turn on your computer.2. Press F2 / F8 / F10 / Del to enter setup (The key depends
on the model of your computer)
3. After the BIOS loads press F9 to run Setup defaults and
reset the BIOS.
4. Then Press F10 to Save and Exit.
Now you have successfully Reset the BIOS back to the default settings.


Thanks to share these details it’s truly nice.
ReplyDeleteon page seo optimization
Hi Santos Scott,
DeleteThanks for your valuable comment. Keep visiting our site for more updates :)
I know this is quality based blogs along with other stuff.
ReplyDeleteniche edit backlinks
This idea is good but might not fully solve the problem. What solved my problem is I entered into the BIOS and change the boot settings to legacy in other for it to support the operating system I am using (Windows operating system)
ReplyDeleteAfter changing the boot settings to legacy I saved by pressing f10 and enter to exit and the problem is solved that's all.
ReplyDeleteHi, I tried all these things, however, still the problem exists. Is there another ways or steps? Thank you
ReplyDelete